Ingest a Schema
There are two ways to do the schema ingest - by using the GUI and by using the command line making use of the REST-API.
Graphical User Interface Method
In this example, we create a json file pp18_file_schema.json with the following content. When you want to ingest another schema, the schema should be ready to upload as a JSON or XSD file which follows the rules of JSON Schema or XML Schema Definition (XSD). The content of the example file pp18_file_schema.json is shown below:
  {
    "$schema": "https://json-schema.org/draft/2019-09/schema",
    "$id": "https://github.com/kit-data-manager/Metadata-Schemas-for-Materials-Science/blob/faeeb3856a267e10bd94c904a5e763ba3ad1e9fe/Reference_Dataset_Zenodo/pp18_file_schema.json",
    "type": "object",
    "description": "This JSON Schema describes the metadata of a single file in the reference dataset by BAM on Zenodo",
    "title": "Metadata Schema of BAM reference data (individual files)",
    "properties": {
      "links": {
        "type": "object",
        "properties": {
          "self": {
            "type": "string",
            "description": "(Required) - URL/ link to the document"
          }
        },
        "required": [
          "self"
        ]
      },
      "checksum": {
        "type": "string",
        "description": "(Required) - checksum of the document"
      },
      "bucket": {
        "type": "string",
        "description": "(Required) - string indicating the dataset in which the document is contained"
      },
      "key": {
        "type": "string",
        "description": "(Required) - key of the document (File name)"
      },
      "type": {
        "type": "string",
        "description": "(Required) - File type of the document"
      },
      "size": {
        "type": "number",
        "description": "(Required) - Size of the document in bytes"
      }
    },
    "required": [
      "links",
      "checksum",
      "bucket",
      "key",
      "type",
      "size"
    ]
  }
-
In the Schema Management tab (the default landing page upon accessing the NFDI-MatWerk Metadata Repository from https://matwerk.datamanager.kit.edu), click on the Register new Metadata Schema button on the bottom right. This button won’t be activated unless you are logged-in. Therefore login first if not already logged-in.
-
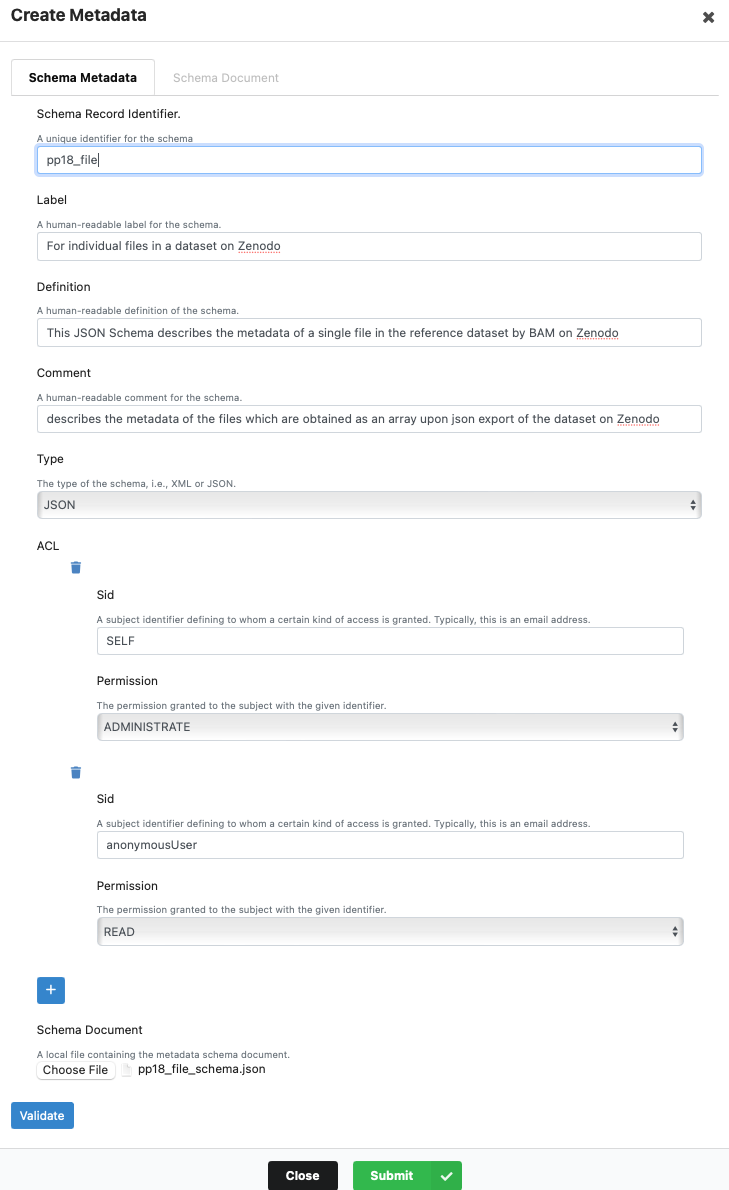
Fill in all the required fields in the Create Metdata window, and upload the metadata schema as JSON or XML and validate everything by clicking on the Validate button on the bottom left. In this case,
anonymousUserhas been set right away in the ACL and thus the schema is made available publically (published).
-
If the administrative metadata (Identifier, schema type, etc.) of the schema in current tab called Schema Metadata are valid, the outline of all the fields will turn green. Please note, in this step, schema validation against its syntax is not taking place and only a validation of the administrative metadata for the schema will take place.
-
In the next tab Schema Document the content of uploaded the JSON/XSD file is now visible. Click on the green Submit button on the bottom right to finalize the submission of the schema. Now the schema will be checked for syntax errors by the MetaStore, and if everything is okay, a new schema record will be created and displayed on the dashboard as in the image below. Else an error message will be displayed and the record won’t be created. To view specific error messages raised by the MetaStore, look into the Network Messages in your browser available as part of Developer Tools in most browsers like Chrome or Firefox.

Link to the created Schema: https://matwerk.datamanager.kit.edu/api/v1/schemas/pp18_file?version=1
Command Line Method
In this example a schema-record schema-record.json, is created for a JSON schema with an identifier “my_first_json”. The file called schema.json is then the corresponding schema file. So there are two JSON files, one for the schema-record and one for the schema itself.
- Create a new schema record by using the
cat > schema-record.jsoncommand. Type the following code in the command prompt and save the file by pressing Ctrl+D. You may replace the"schemaId"with an identifier of your choice for the schema. This identifier should be without white spaces. As"type"you may chose “JSON” or “XSD”. These are the two mandatory fields while creating a schema record.{ "schemaId" : "my_first_json", "type" : "JSON" } - If you have a ready made schema, you can directly use it in Step 4. Else, create the schema file with the
cat > schema.jsoncommand and press enter. Edit and copy the snippet below to reflect your schema inside theschema.jsonfile. PressCtrl+Dto save the schema file.{ "$schema": "http://json-schema.org/draft/2019-09/schema#", "$id": "http://www.example.org/schema/json", "type": "object", "title": "Json schema for tests", "default": {}, "required": [ "title" ], "properties": { "title": { "$id": "#/properties/string", "type": "string", "title": "Title", "description": "Title of object" } }, "additionalProperties": false } -
Follow steps 1-3 under the data-management section to authenticate with the keycloak token.
- Type the following code in the command prompt and press enter to ingest the schema:
curl 'https://matwerk.datamanager.kit.edu/api/v1/schemas' --oauth2-bearer ${TOKEN} -i -X POST \ -H 'Content-Type: application/json' \ -F 'schema=@schema.json;type=application/json' \ -F 'record=@schema-record.json;type=application/json' - MetaStore assigns some default information like the creation time, cretor name etc. automatically when not provided explicitly in the beginning. The ingested schema can then be checked again and modified if needed.
Detailed documentation is available at https://kit-data-manager.github.io/webpage/metastore/documentation/REST/introduction-schema.html
Publish Metadata Schema for Unauthorised Use (GUI Method)
To publish a schema to make it available to the public, the ACL must be changed accordingly. Use the edit button to the far right of the schema record listing. The ACL must have a user called anonymousUser and the rights for this user must be set to READ. In no case, the anonymousUser should be assigned higher rights. How ACLs can be set can be found here 